Common Pour Mistakes and How to Fix Them
Most pouring problems feel mysterious exactly once. After that, they become mechanical — a pitcher held too high, a wrist locked at the wrong moment, a flow rate that never found its groove. The good news is that nearly every recurring mistake maps to a specific physical cause, and physical causes respond well to deliberate adjustment.
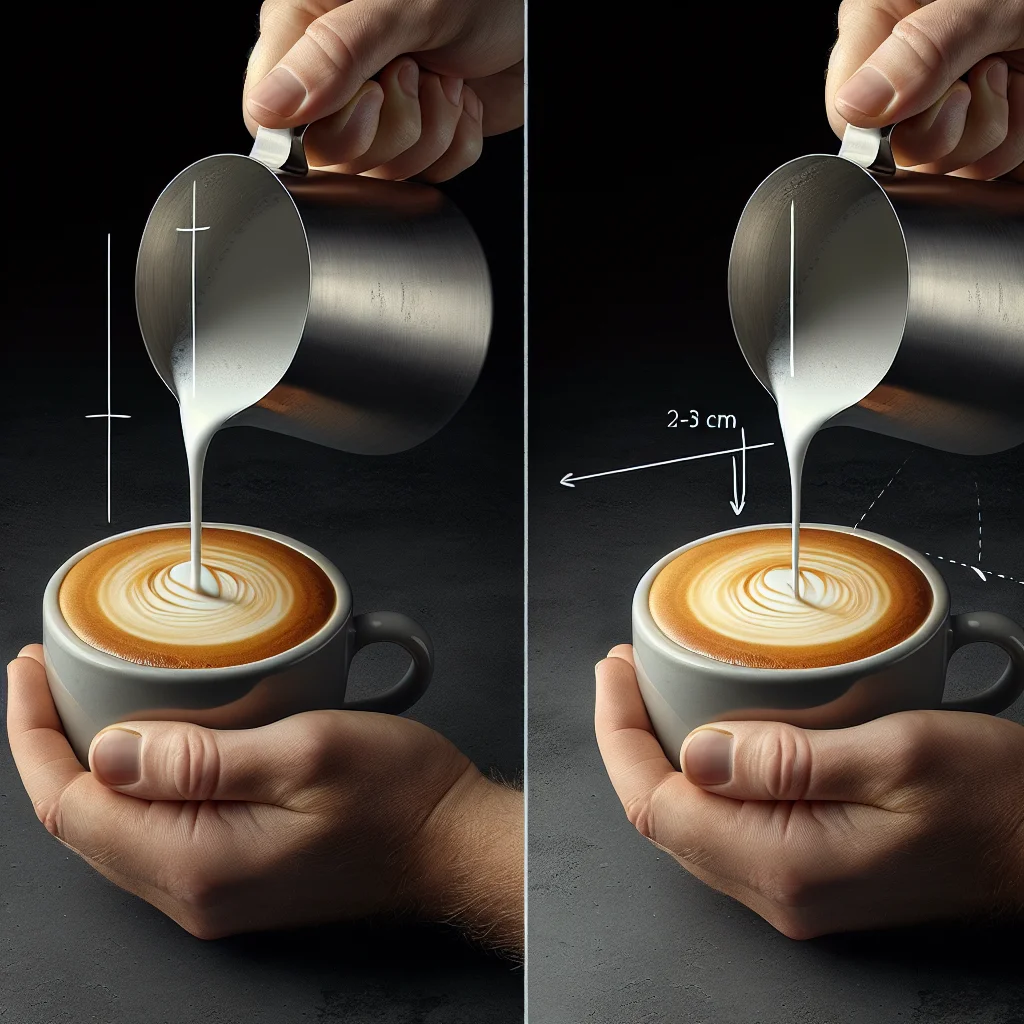
Pouring Too High, Too Long
The single most common error among home baristas who can steam well but can’t land a pattern: the pitcher stays elevated for the entire pour. Height is useful during the initial base-building phase — it sinks milk beneath the crema and builds contrast. But if you never bring the spout close to the surface, the white stream simply disappears into brown.
What it looks like in the cup: A uniformly tan surface with no definition, or faint ghost shapes that dissolve before you finish pouring.
The fix: Think in two distinct phases. During the first half of the pour, the spout sits roughly 3–5 cm above the surface, directing milk into the centre. As the cup fills to about halfway, drop the spout down until it nearly touches the crema — within a few millimetres. This is where white appears. If you find yourself unable to get close enough, the cup angle may be the issue; review the tilt mechanics covered in Pouring Fundamentals.
Flow Rate Surges and Hesitations
A steady, controlled flow rate is harder than it sounds, mainly because your hand wants to do two things at once — tilt the pitcher and move it through a pattern. The result is often a pour that surges when the wrist commits to a wiggle and then stalls when attention shifts back to volume control.
What it looks like in the cup: Blobs where you meant to see thin lines, or broken segments in a rosetta where the leaves should connect smoothly.
The fix: Isolate the variables. Practice pouring into a cup of plain water with no espresso beneath it. Remove the pressure of “ruining a shot” and focus entirely on maintaining a constant, narrow stream while your wrist moves side to side. The tilt of the pitcher controls volume more than you think — a small change in angle produces a large change in flow. Let gravity do the metering. Your wrist handles pattern; your forearm handles tilt. These are separate jobs. More on this division of labour lives on the Wrist and Body Mechanics page.
Misreading the Cup Fill Level
Timing your transition from base pour to pattern pour depends on reading how full the cup is — and cups lie. A wide, shallow cup reaches the critical halfway point faster than a tall, narrow one. Beginners often memorise a time interval (“start the pattern at three seconds”) rather than watching the liquid level. This leads to starting the design too early (not enough contrast) or too late (no room left, pattern gets compressed or floods).
What it looks like in the cup: A heart crammed into the top third with bare crema below it, or a tulip whose layers merge into a single white mass near the rim.
The fix: Watch the surface, not the clock. The cue to begin your pattern is visual: the crema should be roughly 1 cm below the rim of the tilted cup. At this point, level the cup, drop the spout, and commit. Practise with the same cup every session until the fill level becomes instinctive, then gradually introduce different shapes.
Incomplete Strike-Throughs
The strike-through — that final line drawn through a rosetta or tulip — often gets rushed because you’re running out of cup space and mildly panicking. A fast, jerky pull-through skews the pattern to one side or barely registers on the surface.
The fix: Slow down. Raise the pitcher slightly to thin the stream, then draw through the centre of the design at a steady pace, lifting away at the far rim. The motion is forearm-forward, not wrist-flick.
Every mistake listed here is something you will commit repeatedly on the way to consistency — that is the process, not a detour from it. If a specific pattern keeps failing in a way you can’t map to these common causes, the annotated pour diagrams in the Pattern Catalog break each design into individual frames worth studying. For the foundational mechanics underlying all of this, start with Pouring Fundamentals.